Monday 31 July 2017

Chain of Command Scenario Three

It is my last day of holidays and I spent it playing a solo game of Chain of Command (CoC). I kept a journal of events for the write up and review. This scenario was called attack and defend. The defender deployed his deployment markers in his deployment area. The attacker started on the baseline but gets to have D6 free moves before the game continues back and forth. The Germans rolled well for force morale (11) and the Soviets rolled poorly (8). The Germans rolled 4 free moves and tried to set up his deployment so they could deploy in the rock walled field. This they succeeded in doing...


poker chips used for deployment markers


Jump Off Points

Turn 1

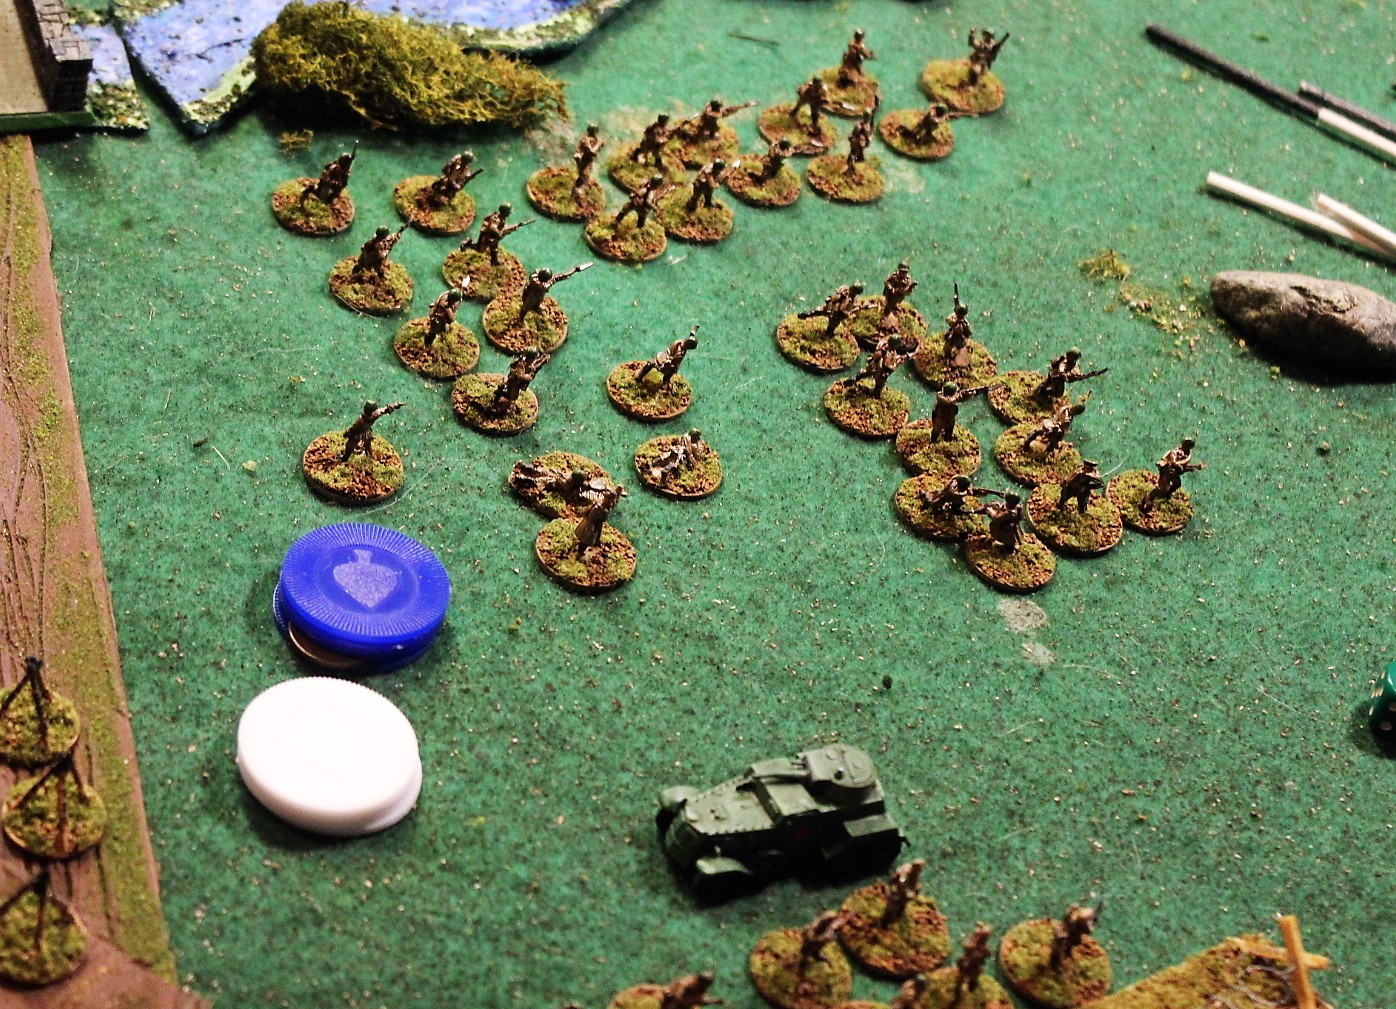
The Germans had the highest force morale and took the first turn. They deployed 1st Section in the center behind the rock wall and went into overwatch. They also deployed 2 scouts on the right next to the field.

The Soviets responded by having three turns in a row. They deployed A Section on their right in the woods, outside of the overwatching German's arc of fire. They planned to outflank the Germans. The extra turns allowed A Section to advance through the woods but their fire was ineffective. The Soviets tried to deploy scouts and B Section but they failed 4 attempts to deploy their troops due to the German preliminary bombardment.

The Germans responded by turning to face their flank and made room to deploy a second section if needed.

 German troops take casualties as they redeploy but their superior firepower soon begins to tell


The Soviets failed to bring in any reinforcements and had to use a Chain of Command dice to end the turn. This also ended the effects of the preliminary bombardment.

Turn 2

The Germans deployed 2 Section along the rock wall and went into overwatch. 1 Section suppressed the Soviets in the woods and fired for effect causing 2 shock. 

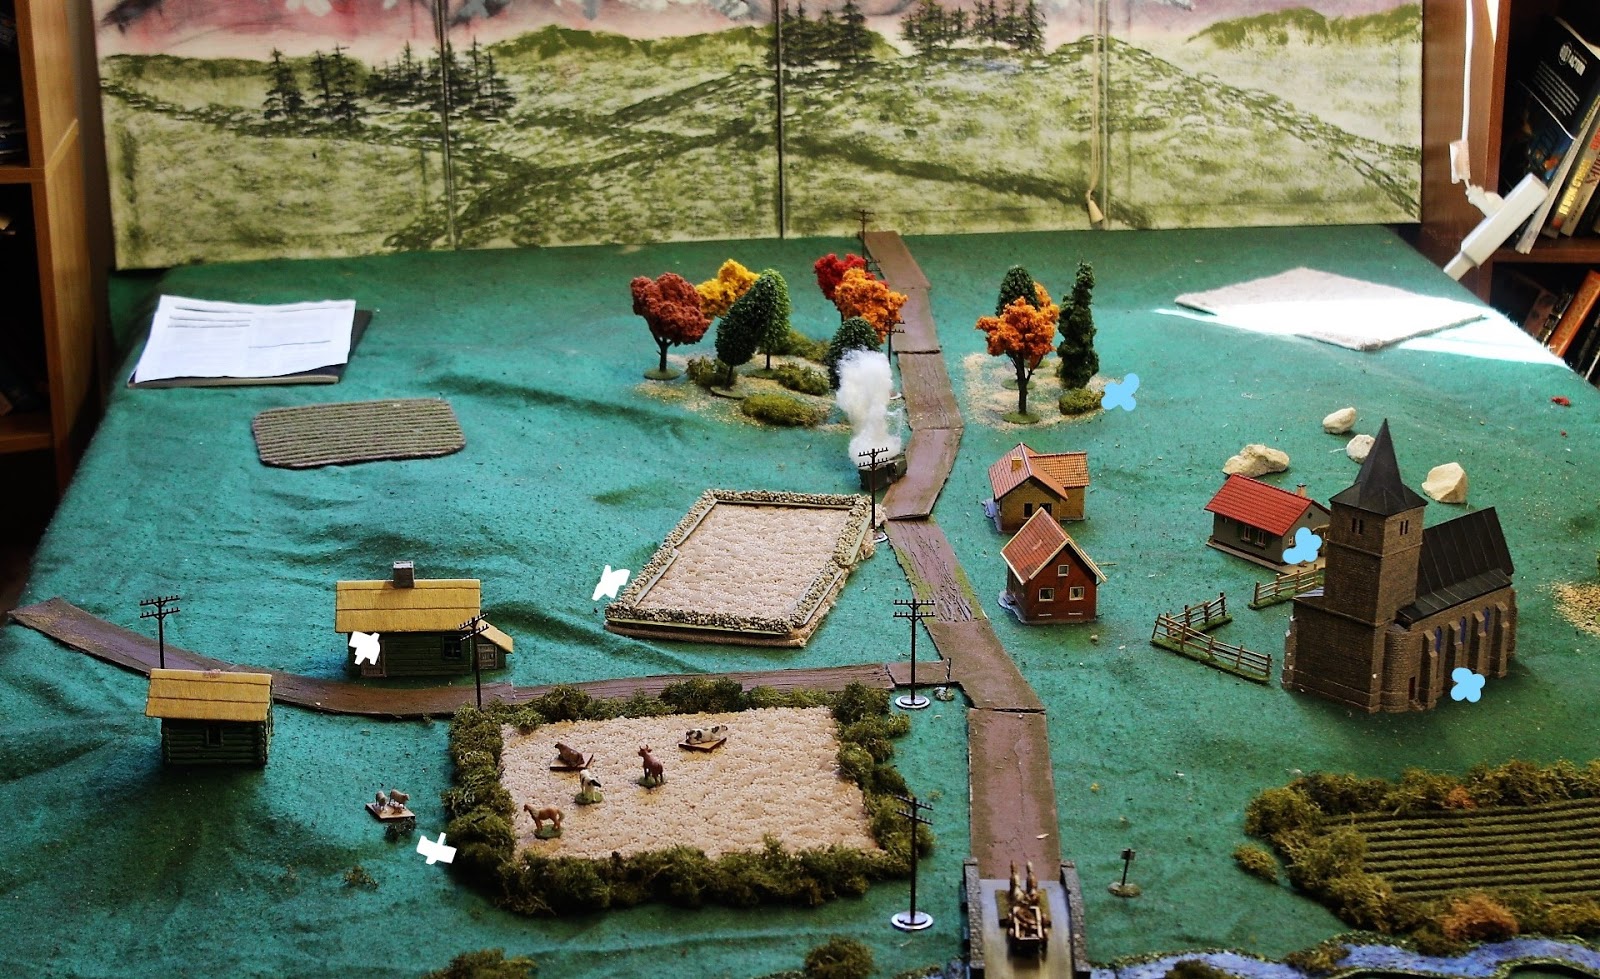
The Soviets finally started bringing in reinforcements. They deployed B Section in the church and fired on the overwatching 2 Section causing 1 kill. The Germans returned fire in overwatch but could not penetrate the thick walls of the cathedral. The Soviets also deployed their B64 armored car which advanced at the double.

The Germans fired for effect with 1 Section and caused 2 kills and 2 shock on A Section in the woods. 2 Section fired to suppress the cathedral with one Team and advanced to the door of the house in their front. The German reconnaissance 1/2 track arrived and advance up the road.

The Germans abandon cover and try to capture a key piece of terrain


The Soviets saw their chance to catch the Germans in the open. They deployed a Section of Scouts in the house that 1 Section was sitting in front of. They blazed away with their SMGs but only inflicted 1 shock! They had better luck on the other flank where their second Scout team surprised the scouting German team and neutralized them. A Section rallied off some shock in the woods.

Soviet Scouts surprise a German Scout team and take them out


The German phase saw the arrival of the Senior Leader. He ordered the exposed Team from 1 Section lob  3 grenades through the windows of the house with the Soviet scouts reducing the 4 man team to 1 man. They thought about assaulting but an elite scout with an SMG would have taken a few Germans with him. Instead, the Section put the barrel of the LMG and SMG in the windows and shot down the last Scout. In hindsight, the rules say the Germans should have had to assault as they were within 4" inches of each other.1 Section fired for effect into the woods again, causing 1 kill, 2 shock and lightly wounding the Soviet squad leader.

With the loss of their Scout team, the Soviets committed their last reserve. C Section arrived with the Senior Leader in the same house the Scouts had deployed in. They dropped grenades at the exposed Germans outside the house and then assaulted. The Germans rolled well and took out 2 Soviet riflemen and injured the Senior leader before they were wiped out. Now the Soviets were the exposed ones out n the open in front of the remnants of 2 Section. B Section did what they could to help by providing covering fire from the cathedral. A Section withdrew into the safety of the woods as they were too battered to contribute to the defense until rallied.

Victorious C Section is badly exposed in front of the house


The Germans deployed 3 Section in the cow field and opened up on the beleaguered C Section inflicting 3 kills and 1 shock. 2 Section managed to inflict 2 shock and lightly wounding the Soviet Junior Leader from throwing grenades and firing while suppressed. The German half track added its fire and caused another kill and shock.

3 Section arrives and pours fire into the Soviets


The Soviet force morale had been reduced to three and all they could respond with was some accurate rifle fire from the Scout Section which caused 2 kills on the newly arrived 3 Section.

The final German phase saw fire from 1 and 3 Section finish off C Section. To end the game, the German Senior Leaded lead the remnants of 2 section to throw grenades and assault the wounded Soviet Senior Leader and wounded Junior Leader from C Section resulting in their demise and the collapse of Soviet morale.

This was a landslide win for the Germans. The panzer grenadiers are powerful with their 2 LMG's per section. I am continuing to learn these rules and spent a lot of time with my nose in the rule book. It is a game that offers some interesting command decisions. Should I deploy all my units early and increase my firepower? Should I hold units in reserve and take advantage of my opponents mistakes? Should I use lots of scouts to try and force my opponent to deploy troops to defend their jump off points? Having the last reserve was decisive for the Germans when they deployed them to finish of C Section. I like being able to use the leaders to have units throw grenades. These are very effective weapons, causing 3 auto hits against troops in confined spaces. Too effective? I don't think so.it was not clear in the rules if a unit outside a house is assaulted by a unit in the house, do they get hard cover? I ruled that they did. I will post to the FB group and see what they say.

Next? My friend Jonathan is in town. I will see if I can get the usual suspects together and put on a game for him. Also, my boy has rekindled his interest in Song of Blades and Heroes. Stay tuned for more games and pictures.


Sunday 30 July 2017

Prelude to Battle

I have been searching for some motivation to get my WWII stuff out. I was planning a 28mm Chain of Command game but changed to 15mm. The reason? A shiny new piece of kit. I bought a 15mm Cathedral pre-painted and good to go. Made by Battlefront. I have not played Chain of Command in a while so I have been reviewing the rules all week in preparation.


The Russians will be defending the town from a German counter attack. Here is the scene before deployment. Russia on the right and Germans on the left.


The Russians have 3 squads of 10 men each with an LMG. In support they have a B64 armored car, some barbed wire and a Scout squad.


The Germans are Panzer Grenadiers. They have 3 squads with an SMG and 2 LMG's, and a panzerschreck team. In support they have a pre game barrage and a sdfz 250 with a reconnaissance squad.


This is Charlie finding a warm spot in the sun

I visited the fortress of Louisbourg this week during a week long trip with the Venturer Scouts to Cape Breton Island. A feature of architecture during the French and Indian Wars. It has been somewhat restored after being thoroughly dismantled by the British. It is Canada's 150 Anniversary so all the National Parks are free.
Gate guard in period dress (French)

Governor's residence in the distance

A model of the changing of the guard

I purchase a 10x6' bolt of watery looking cloth in anticipation of getting my Langton ships in them mail and playing naval games. The ships shown are made of card from an old CCG game.


Saturday 22 July 2017

Classic Rome Vs Carthage Matchup

Today I got to play a rousing game of Sword and Spear with two of my mates. We were celebrating the completion of Zack painting his Romans and Carthaginians. The figures are mostly Newline 20mm with a few standard plastic figs as well. We have played many straight up fights and decided to try an attack on a prepared defense scenario. The Romans attacked with 500 pts and Carthage defended with 400 pts.

Romans:


3 Captain
2 Veteran Hastati
6 Hastati
3 Cavalry
3 Velites
1 Cretan Archer


Roman Deployment


Carthaginians:

1 General
1 Captain
3 Veteran African Spearmen
2 Warband HI
2 Spanish Scutarii MI
2 Spanish Cavalry
2 Javelinmen
1 Balearic Slinger
1 Elephant

Carthaginians on the hill

Both armies took the Resupply Strategem.

The Carthaginians had the advantage in terrain and deployed a river on their right flank and a long ridge to deploy their infantry on. They had to set up first and set all their foot in a line on the ridge and 3 units of skirmishers forward. Their elephant was on the right and the cavalry was on the left.

Close up of nice painting


The Romans set their heavy infantry in a line 2 deep facing the ridge. 2 Velites deployed on the left to oppose the Elephant and 3 Cavalry and 2 skirmishers deployed against the Carthaginian cavalry on the right.

Carthaginian left


Both sides advanced their flanks. The Roman Velites tied up and routed the Elephant that advanced unsupported. The 2 Carthaginian Cavalry were overwhelmed by the greater Roman numbers opposing them after several rounds of combat. The Carthaginian Skirmishers in the center were destroyed but not before damaging a unit of Hastati in hand to hand.

The Cavalry thunder forward


We agreed to call the game after 4 turns. Carthage was one unit away from retiring from the field and the Romans had only lost a Velite unit.

The Elephant in the room


We discussed the game afterwards and concluded that Carthage should have held it's flanking forces in reserve and used its terrain advantage to fight the front lines. Throwing in reserves when the heavy foot were embroiled. It takes a patient wargamer to resist attacking and let the enemy come to you.

The Romans fell the mighty beast


 I have played S&S 6 times or more and have not seen the successful use of skirmishers deployed in front of the heavy infantry. They perform much better on the flanks.

Two lines of Cavalry battle to the death

Thanks for an excellent outing boys. Looking forward to the next gathering.


Wednesday 19 July 2017

Back to the Brush

I am slowly returning to the painting table after a fairly long break. Last weekend I painted up a ship but that was so I could experiment with rigging it. Since then I have pulled out some fantasy figures and started painting them. It is more challenging to paint individual models rather then massed units. I have to think about each color rather than painting uniforms. I find that I limited myself to a small palette of colors to work with so that each batch of models is somewhat themed. Some of these are treasures found at Huzzah from the Bring and Buy. The big spider and the gnolls are from the AD&D line that recently came out. These are fun models but the casting lacks detail.

Not sure what this one is. He will make a fine musician for a unit of sado-masochist warriors

Phase Spider
 Dark Elf Princess
 Lanky Troll
Gnoll Brothers

 Beholder


I also purchased a digital copy of Fighting Sail from Osprey Games. I had a quick read through it last night. There are some interesting mechanics but I was disappointed that it was an IGOUGO game for movement and fire. I will give it a test drive before passing any judgment. I joined an active Facebook group for the rules and saw some interesting house rules. I pulled out my collection of card ships from the old Pirates game by Wizards of the Coast. I have plenty to use for a tester game.


Sunday 16 July 2017

Friggin' in the Riggin'

I have spent the weekend painting and rigging the GHQ 1/1200 ship La Superbe. I am standing on the knowledgeable shoulders of the following blogger:


GHQ website photo


http://volsminiatures.blogspot.ca/2014/05/rory-mccreadies-step-by-step-guide-to.html

This guy rigs with thread and does an amazing job. I found another blogger who used paint brush strands to make the rigging. This looks much less fiddly and gave a nice result. Unfortunately, I cannot find this blog to give him/her credit.


First up was to paint up the model. I experimented with an art felt ($5) to put the black trim on the sails. This worked pretty well but when I painted the rest of the sail, the ink ran and as a result my sails are pretty dark.


I inherited a lovely piece of kit for this project. It is a magnifier with a light. I painted without it for the most part but it came in handy putting on the hull stripes.


Next, too the rigging. I cut a few strands of black brush and put it in a jar. I followed Rory's rigging guide for thread but replaced the thread with the paint brush strands and viola...

 This is the standing rigging. The model did not come with any rat lines but I plan to purchase some fancy brass ones from Langton. At this point the rat lines would go on but will move on to the running rigging which will be done with the gold colored brush strands. The pictures do not show the black rigging well. Next time, white background!


2 hours later the running lines have been added...


Monday 10 July 2017

Battle of Friedland 1807


I had the pleasure of sorting out the French and Russian troops for the Battle of Friedland. Sorting and labeling French and Russian 15mm troops for the battle can often take as long as the game itself but it gives me a chance to play with my toys and speeds up the game set up and play on game day.

A view of the table from the first time we played in January 2015


The battle takes place in East Prussia June 14 1807. After the indecisive battle of Eylau earlier in the year, the French pursued the elusive Russian army until it turned at bay at the confluence of the Muhlenfluss and Alle rivers. Both armies started out with a screening force that was gradually reinforced throughout the day. Napoleon got there “firstest with the mostest” and concluded a brilliant campaign with a victory resulting in the Treaty of Tilsit.

Our battle was refought using the Commit the Garde rules. These are meant for large scale battles 1”=125 yards and a stand =4-500 men. It is played on hexes and tends to be very decisive.

Brent and I commanded the French and Martin commanded the Russians. The rivers divided the battle field which meant that the cavalry would battle in North and a French Grenadier Division faced Russian infantry and cavalry.

The cavalry battle in the north was ferocious resulting in many casualties. The French held the field and pressed toward the bridge to Friedland and bottling up reinforcements in difficult terrain.

The French Grenadiers in the south competed for defensive terrain with the Russians and were punished by effective combined arms attacks from the Russians.

Both sides struggled to get reinforcements on the board but eventually, the French were able to bring in a decisive number of troops to reinforce a depleted initial force. The Russians saw the desperation of the situation and summoned the Guard Grenadiers to try and turn the tide but it was too little too late.

This is the second time we have played the scenario and the Russian player learned from the last battle to deploy his cavalry Corp in the open to avoid getting penned in and destroyed piecemeal. This let the Russians put up a good fight but the French had better quality troopers and were able to get more actions than their poorer led counterparts.


The battle technically ended early on when the Russians failed an army moral roll. We all agreed to play on as we did not want a single die roll to determine the game and end a planned afternoon of gaming.

Deployment view from the Russian rear

French on the left. Swirling cavalry fight in the North

Same spot a few turns later. Depleted units and French gained ground

This line of hills were the key to the South and hotly contested

Saxon Cuirassier and French Hussars prepare to capture Russian pontoon bridges

End game with the French crossing the river into the Russian rear from the North

Endgame in the South. French reinforcements arrive to maintain the pressure

Not sure what is coming next. Hopefully, I will find some motivation to pick up a brush and finish my 1/1200 74 gunner and try out my rigging plan using paint brush bristles instead of thread. An idea stolen from another blog.